Foamed Top Panniers...

Here's another trick I did with my Touratech Panniers that might come in handy for you.  Thanks to Bren Adelante for picking up the foam for me when she was out and about running errands.  Basically I got a sheet of 1/4" foam from Bren who got it from Foam Mart in Burbank, CA.  The foam sheet was big enough to create both a 9"x10" piece and a 7"x10" piece.  One for the 41L pannier and the other for the 35L pannier, respectively.  The idea is to mount the foam pieces on top of their respective panniers to create a semi tacky surface to prevent things from sliding around when they are placed on top of the panniers.  I didn't bother creating stencils before cutting the foam.  Instead I just eyeballed the fit.  If you're not comfortable with eyeballing, you can create stencils out of pieces of paper and some tape.  My tools were a pair of scissors, mounting tape, some isopropyl alcohol, and a piece of paper towel.

Before I did anything, I wiped down the top of  the panniers with alcohol.  This will clean the surface of the pannier and allow any mounting tape to stick like there's no tomorrow.  The mounting tapes I used are a combination of 2 different types of 3M mounting tapes.


The red roll of double sided 3M mounting tape is an indoor/outdoor mounting tape.  It can hold up to 50 lbs before failing.  However, it is expensive so I supplemented the mounting of the foam with the regular 3M wall mount tape.  The regular stuff can hold up to 5 lbs.  As you can tell, there is a big difference in strength between the two mounting tapes.  What you see in the picture above is what is left after the mounting is done.  Be wary, the outdoor mounting tape is very sticky, and works very well.  It has a tendency to stay wherever you put it.  So be sure to put the tape in the right location the first time around.  It sticks too well if you ask me.

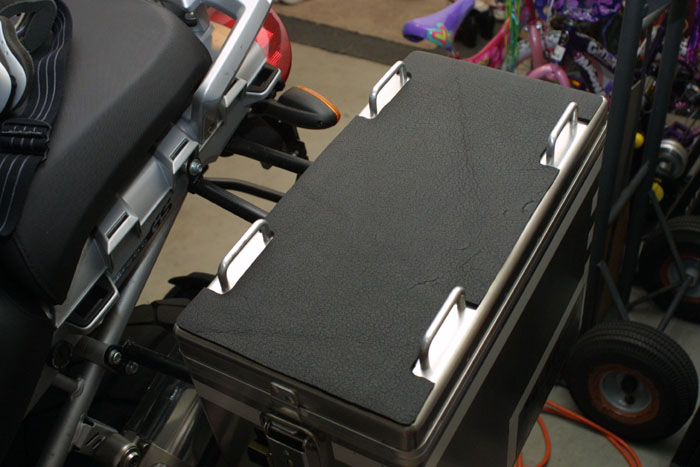
Here are the rough locations of where I put the mounting tape on the top of the pannier.  The left side pannier has mounting tape applied in a similar pattern.


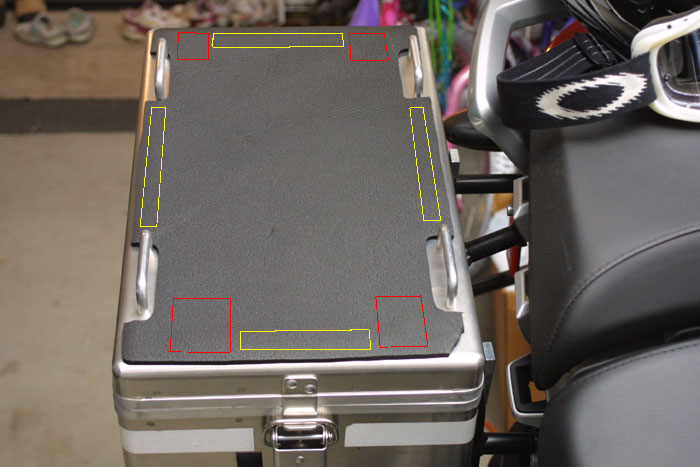
Right side pannier (right side relative to rider facing forward on bike)

The yellow boxes represent the locations where I used the regular mounting tape and the red boxes are the rough locations where I used the indoor/outdoor mounting tape.  This should hold the foam down pretty good.  Here are some more shots of the foamed top panniers.


Left side pannier.


1/4" thick foam


I figure the foam should last a while.  Eventually, the foam will disintegrate from exposure to the sun.  Since the amount of mounting tape used is so minimal, it should be easy to remove the foam and the mounting tape when it comes time for a new set.  Worst case, all I have to do is use acetone to remove the mounting tapes' adhesives.


Update [July 15, 2006]

It has been approximately 8 months since the installation of the foam on the panniers.  The foam is doing quite well even though they get on average 8-10 hours a day 5 days a week of sun light, and temperature exposure (Highs into the 100+F degrees).  They have also gone through innumerable wet and dry cycles.  The foam is visibly drying out from the UV exposure but it's still quite effective in performing its task, preventing things from sliding.  At this point the foam will definitely last the year and maybe stretch into a year and a half or even two years.  I'll update this more as it goes and document when it fails and is replaced.  For me, it's doing exactly what I wanted it to do.


Written on: Dec 6, 2005
Last modified: July 15, 2006